
My serverless journey
23 minutes reading
How many times have you heard of Serverless? I’ve heard about it so many, too many maybe,so I decided to embark on this journey to discover this new technology.
So I prepare the backpack, the boots, rope, harness and I start..
Intro
Outside is a gloomy, autumn day, the right climate to stay in houses with a cup of coffee and my notebook. Click on my faithful companion Firefox, where to start? First of all I have to choose which cloud provider to use ..5 seconds to think.. AWS of course.
The first research leads me to hundreds and hundreds of blog articles, really so much material. I try to make a summary so I convince myself to have understood:
IaaS (Infrastructure as a Service)
Do you know servers? Those strange computers, in dark rooms, ok, out of fashion anymore… why? They are difficult to manage, you have to use a thousand precautions, uninterruptible power supply in case the light goes out, the right temperature, absolutely no dust, fire doors, fire systems with argon etc..etc.. so to ensure a stable service without become crazy and spend a lot of money services like AWS, Google Cloud, Azure and many others “rent” part of their data center, you only have to configure the infrastructure with a few clicks and only worry about the software part.
SaaS (Software as a Service)
After this great step forward there are other problems (and of course nobody likes them), you have to keep up-to-date the operating system installed on your virtual servers, install security patches, configure a scaling of the computational resources, redundate the infrastructure in order to guarantee an high reliability of the service.. and all that, so what have the cloud providers invented to come up against? Manage some of the services like MySQL, Elasticsearch, Redis, RabbitMQ and many others, directly accessing it without having to take care of installing and updating these services, obviously the configuration (even if a little limited) is always possible.
FaaS (Function as a Service)
After this last step still remains the problem of virtual machines that will run your software (always the same problem mentioned above) so what is the next step? The Serverless! That is, managed platforms where the only thing you need to worry about is your code, nothing else, it’s the cloud provider that will automatically take care of scaling, updating the operating systems that host your code and ensuring its reliability.
Server-less does not mean that there are no servers but that you do not need to manage them :)
Framework
After the initial study done yesterday, today is the day of the practical test! There are many guides that explain how to create a simple API using AWS services, but the activation steps of the services are done directly from the web console (or using CLI), however convenient it does not allow you to easily reproduce the configuration steps and the changes are not traced. AWS provides a service called CloudFormation, by describing the infrastructure with a JSON or YAML file you can provision all the resources you need in one go, manage updates and rollback if an error occurs.
Of course, writing a huge JSON or YAML file is not very convenient, so I looked for what AWS framework provides:
SAM a CloudFormation wrapper with extensive local testing capabilities emulating cloud services.
Mobile CLI a fairly old project, undergoing disposal.
Amplify the new framework for serverless applications.
Honestly I found a bit of confusion about what to use but the advice is: SAM for API services, Mobile CLI to avoid, Amplify for more complex applications also equipped with frontend. I then focused on the latter, to see the full experience and see the news.
Amplify
Very very easy to use, maybe even too much, just download the cli
npm install -g @aws-amplify/cliconfigure it following the guided steps
amplify configureenter the root folder of your web application and add Amplify as an addiction
npm install --save aws-amplifyand as a last part initialize the CloudFormation base stack where just a couple of access rules will be created and little else
amplify initNow the fun part comes up, add services that our application needs, the Amplify CLI will always use guided steps to configure them. By making an overview of what we can add, we see:
- analytics user behavior analysis system and various metrics.
- api to expose the API and add the “server”-side logic.
- auth authentication, yes, user management, login, registration, email confirmation, password reset..
- function simple functions with “server”-side logic.
- hosting the services that will serve your application to clients.
- storage
services for saving, uploading and downloading files. - notifications push notifications.
Wow! There is practically everything and you can add one command
amplify add analyticsand once the selected service has been set up, deploy the changes
amplify pushReally nice, some services I already knew them as Cognito for the management of users, S3 in combination with CloudFront to serve the frontend, Lambda to the application logic, Gateway API to expose the APIs and finally DynamoDB to save and persist data.
Amplify is really a great tool, especially for the integrations for React, AngularJS and Vue.js that allow you to connect services quickly using the framework that we like best. It took 15 minutes to get a simple application (yes, the usual old TODO list) up&running, but if you do not get your hands dirty by putting them in the engine, I do not feel completely satisfied.
Integration
Authentication
I then start to integrate my application written in Vue.js starting from authentication. The configuration of Cognito is really simplified:
amplify add auth1 minute and everything is ready to manage the users.
I am amazed at how much functionality Cognito offers, confirmation of the email and/or telephone number sending you a code (via SMS for the phone), login with Google, Facebook, Amazon and OpenID, and provide a complete self-managed OAuth2 server. To create this, from scratch, with a PHP server or nodeJS at least 1⁄2 days of work would be served, for this I spent 1 minute, it’s crazy.
Data
Now the database, I had already used in the past DynamoDB for some additions but never in combination with AppSync, a fairly recent service (no more than 1 year and a half) that helps you manage access to your data using GraphQL endpoints. It is appropriate to say: the latest fashion!
With Amplify it was really simple, you certainly need to have some experience with GraphQL.
amplify add apithe answer of this command is clear:
? Please select from one of the below mentioned services (Use arrow keys)
❯ GraphQL
 REST
not only GraphQL endpoints but also REST! a step forward to choose the authentication method
? Please select from one of the below mentioned services GraphQL
? Provide API name: myNotesApi
? Choose an authorization type for the API (Use arrow keys)
❯ API key
 Amazon Cognito User Pool
you can use either static keys (generated during this process) or using the authentication system created first with Cognito, obviously I choose the last option.
The cold shower
Today I started writing models for my application, one of Amplify’s most convenient features is the automatic generation of GraphQL resolvers, even with transformers to specify the access level. This last part is vital to restrict user access only to their data and not to the entire DynamoDB table.
Here the first problem, I tried to faithfully follow the documentation but nothing, checking the resolvers generated I saw no difference using or not the transformer @auth. I lost a lot of time on this until, I gave up, I created an issue on the Github respository to ask for support, they really answered me rapidly and it turned out that actually it was not really working… okay, things that can happen.
DynamoDB
During debugging I discovered that the DynamoDB table indexes were created with the Throughput Capacity for Reads and Writes to 5, without possibility of being modified.
For those who do not know, this value is one of the parameters that is used to calculate the cost of the service of DynamoDB: the number of accesses in reading or writing per second (not so simple but I do not enter into the specification). In order not to go into too much detail, this non-relational database answers for each query at the maximum possible speed regardless of the amount of data and there is no limit to the number of lines (pay for the weight in GB of the table). The negative part is a somewhat tricky query engine and you need to carefully create table indexes that are vital for sorting and querying.
A difficult choice
I did not expect that for any test you will pay at least around $13, a bit expensive considering that with less than $1 I have 2 projects of IoT, a GoogleHome action, my website (with two environments) and I use S3 to make an encrypted backup of some important files. With just 5⁄6 models I arrived at disproportionate figures, with a DynamoDB table ready for production when the application was not born yet. I then opened another issue, this time not yet taken into consideration for now.
So I eliminated the project and I got lost, I had found a very easy to use and powerful tool but it’s still too young to be used for production. Being so simple it does not even allow such a deep changes of some parts of it except with different workarounds.
Several nights are spent evaluating alternatives.
A few days later, from the beginning
Over the days I have collected several alternatives to Amplify, difficult because there are no other CLI that with a couple of commands do EVERYTHING.
My choice is Serverless Framework, a very powerful and modular framework with a large community behind which develops hundreds of plugins. I’ve already used it before for some cloud infrastructure and API automation projects and I’ve always been comfortable with it.
Organizing the project structure well
The management of the resources directly uses the CloudFormation templates, this guarantees to be always updated and uses the functionalities served by AWS without having to report the changes within the framework (an example, Terraform uses its syntax and its integration, can not keep up and I always found dozens of bugs).
When there are many resources to add out of those managed by Serverless the official guide explains how to create them in the file, not make the mistake of putting everything in a single file of 2000 lines that is difficult to maintain, better divide it into multiple files
resources:
 - ${file(resources/cognito.yml)}
 - ${file(resources/userRole.yml)}
 - ${file(resources/queues.yml)}
 - ${file(resources/tables/todos.yml)}
 - ${file(resources/tables/projects.yml)}
 - ${file(resources/tables/categories.yml)}
 - ${file(resources/outputs.yml)}
and then in these files specify the resources
Resources:
 AccountTable:
   Type: AWS::DynamoDB::Table
   Properties:
     TableName: "${self:service}-${self:provider.stage}-${self:custom.todosTableName}"
     AttributeDefinitions:
       -
         AttributeName: userId
         AttributeType: S
       -
         AttributeName: id
         AttributeType: S
     KeySchema:
       -
         AttributeName: userId
         KeyType: HASH
       -
         AttributeName: id
         KeyType: RANGE
     ProvisionedThroughput:
       ReadCapacityUnits: 1
       WriteCapacityUnits: 1
     StreamSpecification:
       StreamViewType: "NEW_AND_OLD_IMAGES"
in this way the code will be much more organized and the files smaller and more maintainable.
Use a separate file for configurations
The previous speech also applies to the configurations of the project, better specify a separate file so you can change it depending on the environment or project without using hundreds of environment variables
service: MyService
custom: ${file(./config.yml)}

provider:
 name: aws
 runtime: nodejs8.10
 stage: ${opt:stage,self:custom.env}
 region: ${self:custom.region}
the configuration file becomes much easier to view
env: "Stage"
region: "eu-west-1"

todosTableName: "Todos"
Simplify
Attracted by Amplify to use GraphQL I immediately started using serverless-graphql, easy to use and, with some organization and re-use of resolvers, I arrived at a good point. I realized that I was writing so much code that meant keeping it, testing it, optimizing it, and taking a lot of time to create a simple CRUD feature for the models.
API?
A doubt has arisen: do I really need a GraphQL APIs? Of course they are really comfortable, expressive and easy to keep up to date but why? More specifically: do I need APIs to consume? The APIs are mainly used to access the database, add server-side logic (which the user can not manipulate) and make the service available to third-party services.
Access the data
DynamoDB has its own build-in functionality to limit access to rows, columns and operations based on the user, ie a user can only see certain attributes of the saved object (the “columns”), access only the objects that he has created (the “lines”) and read some tables without the possibility of modifying it this by identifying the user through Cognito authentication. What does it mean? Which has a security system for CRUD access already served, without having to make these checks via code, it is already done! It’s AWS to guarantee this security, do you want to be a developer to do better than the team of 100 Amazon developers? You could, but in 99% of cases you’re missing some vulnerabilities.
You can say everything about the AWS ecosystem according to the opinions, that is inconvenient, expensive, difficult, complicated but it can not be said that it’s not safe, so ok, I give them this part.
Side note: once authenticated a user with Cognito can access any AWS resource limiting access and operations through the IAM Role, not all resources support a granularity like DynamoDB but already only for file upload the S3 service can do it (think about the user’s avatar, for example, convenient!).
Server-side logic
I need it? What am I doing that I have to hide from the user? If I already know that he will only access his lines at most is breaking the formatting of his data, well, he will not be able to view them correctly.
Surely soon or later there will be the need to call third party services to add some functionality, no problem, with Serverless Framework it is really easy to create Lambda functions where you can do whatever you want, the events that can trigger this custom logic are endless: from creating or editing an object in DynamoDB to uploading a file to S3, even all the flow of authentication/registration/confirmation of Cognito users, no more.
Service usable by third parties
Do you need it already? Do we already have partners who ask to be able to take advantage of our services? if the answer is yes, you can create the entire API compartment you want with Serverless (here the guide) creating only the endpoints you need, otherwise you can skip this part.
API Gateway is an AWS service that allows you to organize API endpoints and manipulate request and response parameters.
So, API?
No, I do not need them for the moment. I wanted to give Amplify another chance and use the client directly to access DynamoDB and use the AWS resources I need. Very clean and really simple to use.
In any case, for authentication to the API endpoint you can use either Cognito directly (useful in case calls from the same application that you need to login) of the fixed keys and an access key generated from the OAuth2 endpoint served by Cognito. This last option makes the endpoint very professional by using the security of an OAuth2 access and allows configuring custom scopes to regulate access to resources.
The frontend
Once the backend part was put in place, it was time to start creating the frontend part. I did not have much doubt about the technology to use, having enough experience with Vue.js I decided to choose this framework.
Thanks to the Vue CLI 3 the project startup was immediate
vue create myapp-frontendand following the wizard I chose a very simple configuration and then saved as a preset. The configuration to insert in the .vuerc file in your user home is
{
 "packageManager": "npm",
 "useTaobaoRegistry": false,
 "presets": {
   "vue-router-vuex": {
     "useConfigFiles": true,
     "plugins": {
       "@vue/cli-plugin-babel": {},
       "@vue/cli-plugin-pwa": {},
       "@vue/cli-plugin-eslint": {
         "config": "base",
         "lintOn": [
           "commit"
         ]
       }
     },
     "router": true,
     "routerHistoryMode": true,
     "vuex": true,
     "cssPreprocessor": "stylus"
   },
 }
}
one thing catches your eye, why stylus? It was a choice driven by the component library I want to use: Vuetify. I’ve already used it for some projects and I’ve always felt good, I find it very complete for the quantity of components and, very important thing: very customizable.
Here too, thanks to the CLI, a command was enough to add this library along with some sample configurations
vue add vuetifyAmplify JS
Having Amplify an “à la carte” management I installed directly what I needed as authentication
npm install @aws-amplify/auth --saveVuex
I wanted to use the Vuex module for a simple organizational reason so that I can manage data access in DynamoDB through the Vuex state. I highly recommend it also because if one day you want to completely change the access to the data would be enough to modify the modules of the state created for DynamoDB without having to touch the rest of the application.
Using Vuex module management I created separate forms for authentication, data access and credential management for AWS resources. As mentioned above I used Amplify JS for a comfort factor, it’s not necessary to have the backend project to be used, it can be connected to resources created also with other frameworks or already existing.
So I created a Vuex module to manage access to the Amplify library and configure it
import Amplify, { Auth } from 'aws-amplify';
import AWS from 'aws-sdk';

export default function AmplifyStore(configuration) {

 Amplify.configure({
   Auth: {
     identityPoolId: configuration.IdentityPoolId,
     region: configuration.Region,
     userPoolId: configuration.UserPoolId,
     userPoolWebClientId: configuration.ClientId,
     mandatorySignIn: true
   },
   Analytics: {
     disabled: true,
   }
 });

 return {
   namespaced: true,
   state: {
     auth: Auth,
     aws: AWS,
     configuration,
   },
 };
}
Amplify does not expose the DynamoDB client so I had to authenticate the AWS SDK, so in a separate Vuex module I managed these external clients
import AWS from 'aws-sdk';

export default {
 loadClients({ commit, rootState }) {
   return new Promise((resolve, reject) => {
     rootState.amplify.auth.currentCredentials()
       .then(credentials => {
         const docClient = new AWS.DynamoDB.DocumentClient({
           apiVersion: '2012-08-10',
           credentials: rootState.amplify.auth.essentialCredentials(credentials)
         });
         commit('setDynamoDBClient', docClient);

         // more clients can be initialized here

         resolve();
       })
       .catch(error => {
         reject(error)
       });
   });
 },
};
Now I can easily manage data access with specific separate Vue modules
// ...
   async getTodo({ commit, state, rootState }, todoId) {
       const response = await rootState.aws.dynamoDB.get({ //rootState.aws is the AWS clients module
           TableName: 'Prod-Todos',
           Key: {
             id: todoId,
             userId: rootState.auth.user.id  //rootState.auth is the Amplify auth wrapper
           },
       }).promise();

       if (response.Item) {
           commit('pushTodo', response.Item);
       }

       return response.Item; // return raw Todo object
   },
// ...
Webpack
I found a sore point, as there is obviously aws-sdk: the AWS SDK for access to its resources. This package does not have a modular management of the API so installing it will be added 35Mb in the node_modules, 2Mb compressed in gzip which of course you will have to serve the client browser.
When you build the application, you immediately notice the problem:
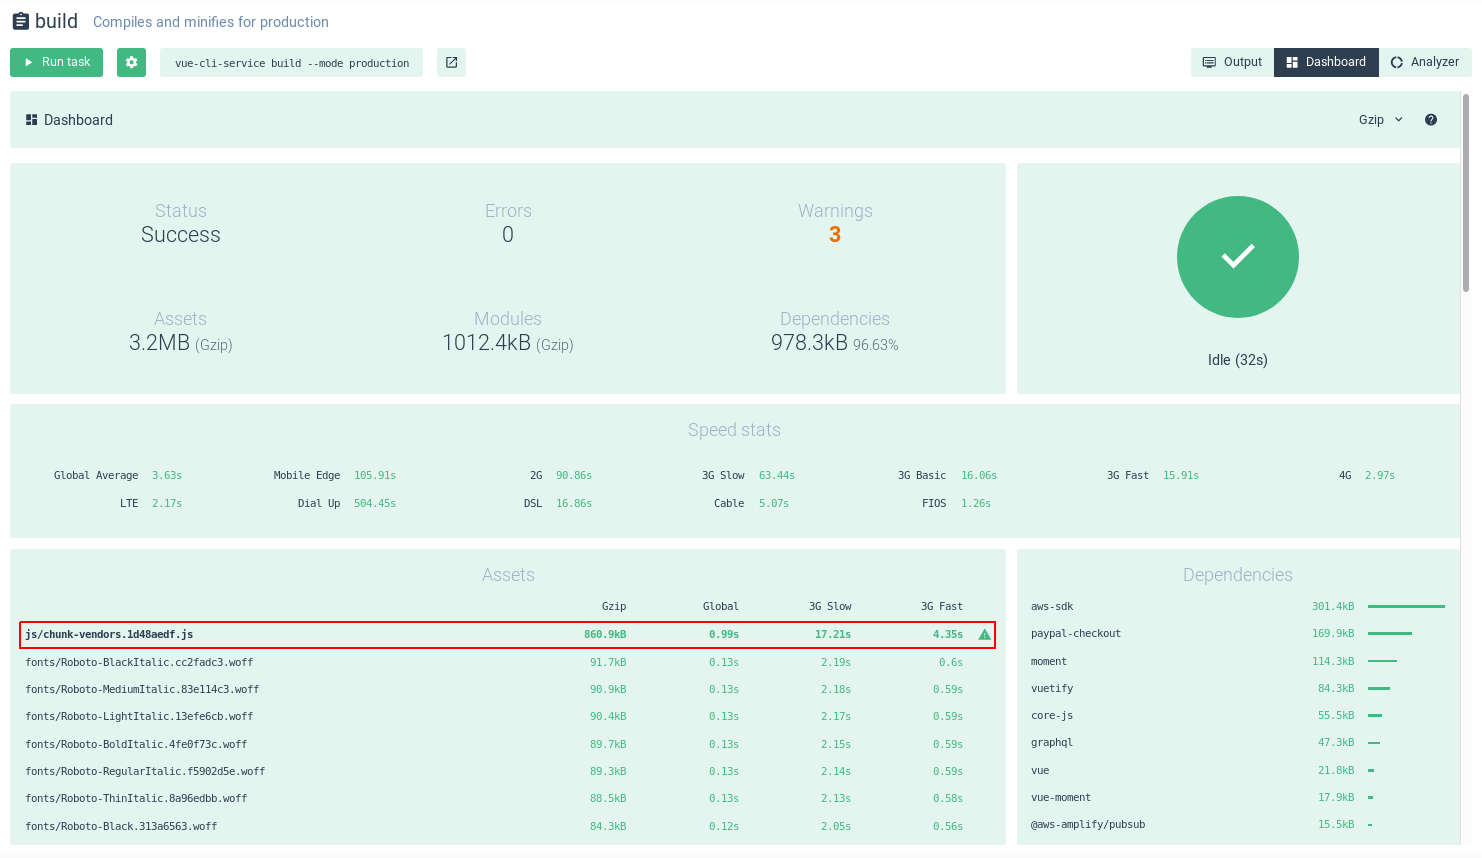
we talk about a 4Mb file of assets, unacceptable to have a light and fast frontend even using a CDN like CloudFront, in fact the compilation shows us that it can keep 4.5s to download with a fast 3G network.
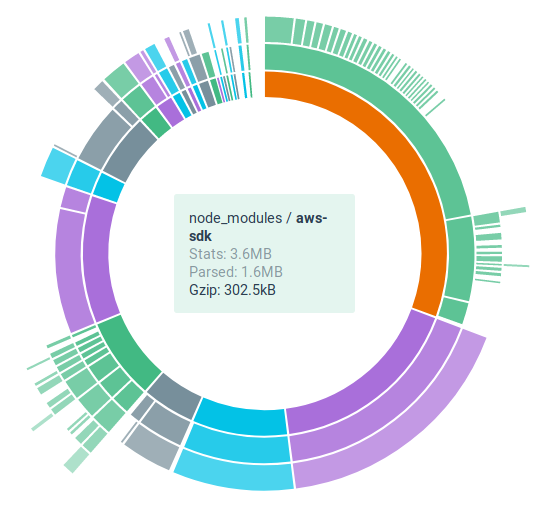
Going to analyze what is in that file of chunk you immediately notice how much it affects the SDS of AWS (along with the PayPal SDK)
 I made a few attempts to separate the modules but the result was the same, the solution I adopted was to configure Webpack to break files into many smaller chunks in order to take advantage of CloudFront’s HTTP2 to quickly serve asset files.
I added the splitChunks configuration in the vue.config.js configuration file
module.exports = {
 lintOnSave: false,
 productionSourceMap: false,
 configureWebpack: {
   optimization: {
     splitChunks: {
       minSize: 10000,
       maxSize: 250000,
     }
   }
 }
}
Launching the build again, the result was this:
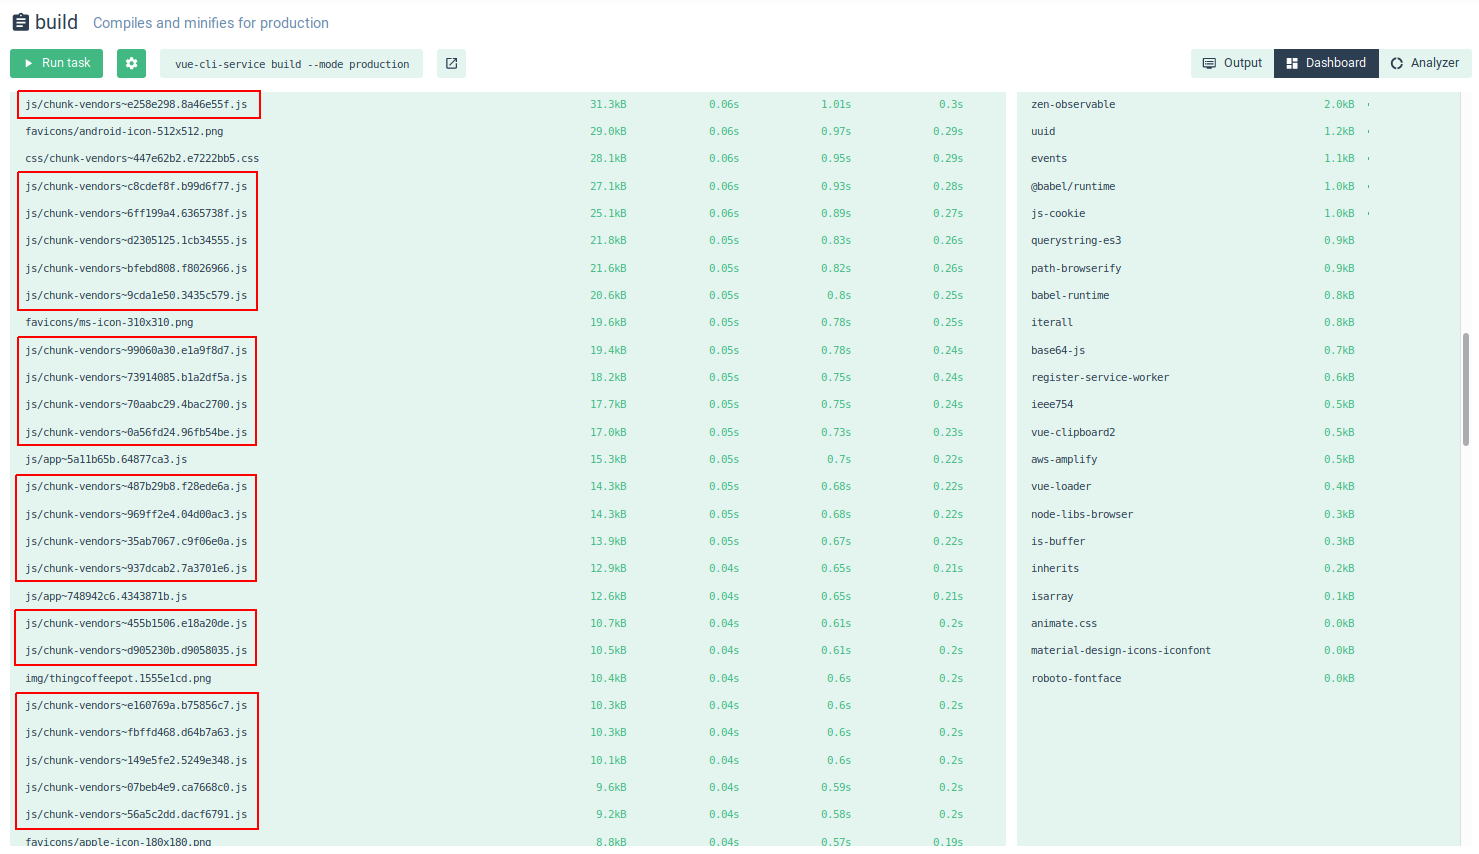 many more files with very small dimensions, so much faster to download in parallel.
Deploy
At the moment I developed the application by testing it locally thanks to the functionality of the Vue CLI to serve, compile the modified files on the spot and reload the browser page when necessary. The next step is to make the application available to the whole world, since it is a static site that happens to be a bean for the Serverless ecosystem.
Pipeline
The AWS service in question is S3, simple to use and with great performance, what is needed is a pipeline that is triggered to commit in the GIT repository with the task of compiling and copying the result within the S3 bucket chosen to host the application.
Being a user of Gitlab I can easily create this procedure by adding the .gitlab-ci.yml file to this project with this configuration:
# Stages

stages:
 - build
 - deploy

# Configurations

variables:
 AWS_DEFAULT_REGION: 'eu-west-1'
 AWS_BUCKET: 's3://my-bucket-name/'

# Build

build:
 stage: build
 image: node:8.10.0
 cache:
   key: "$CI_JOB_STAGE-stage"
   paths:
     - node_modules/
 only:
   - master
 artifacts:
   expire_in: 1 week
   paths:
   - dist/
 script:
   - npm install
   - npm run build

# Deploy

deploy:
 stage: deploy
 image: fstab/aws-cli
 only:
   - master
 dependencies:
   - build
 environment:
   name: staging
   url: https://my-bucket-name.s3-website-eu-west-1.amazonaws.com/
 script:
   - aws s3 sync --acl public-read --delete ./dist $AWS_BUCKET
It can be noted that the only build steps are the installation of npm modules
npm installand then the launch of the script npm for the build
npm run buildsimply what we are already doing locally.
The pipeline will be automatically triggered at each commit on the master branch, as specified within each step
only:
 - master
Static website on S3
Now that we have the files compiled in our S3 bucket it is necessary to enable this feature. To do this, go to the AWS console, select the S3 service, select our bucket, select the Properties tab and then enable the Static website hosting feature by checking Use this bucket to host a website .
At this point it will be asked to select the index document (in our case index.html) and the error one, since all the routing is managed by Vue router we can directly use index.html or in case you want to draw a personalized error page, change it with the necessary document.
Now by browsing the URL <bucket-name>.s3-website-<AWS-region>.amazonaws.com we will be able to see our application works as expected. However, it can be noted that if we navigate a specific path without first passing through the site root, it will reply to the error page (if customized) or the application with the correct page but with an HTTP error code (403). This is because inside the bucket there is not the folder required by the path.
To overcome this problem we return to the Static website hosting configuration this time adding in the textarea Edit Redirection Rules this
<RoutingRules>
 <RoutingRule>
   <Condition>
     <HttpErrorCodeReturnedEquals>403</HttpErrorCodeReturnedEquals>
   </Condition>
   <Redirect>
     <HostName>my-bucket-name.s3-website-eu-west-1.amazonaws.com</HostName>
     <ReplaceKeyPrefixWith>#!/</ReplaceKeyPrefixWith>
   </Redirect>
 </RoutingRule>
</RoutingRules>
in this way the path will be rewritten using the hashtag as prefix and will be processed by the Vue router. We will now see the application working properly.
Static site optimization
The price of the S3 service is based on how much space we use and how many access requests we make to our files, regarding the first parameter there is no problem, it is very light a static web application, regarding the second parameter can be a problem.
To optimize this cost and improve the speed of the site, it is better to use CloudFront to serve the content through the Edge locations, ie servers scattered around the world where the content will be replicated, this allows users to download content from the server closest to them. Regarding the cost the price of CloudFront is based on the traffic that is served and is lower and better optimized than paying for requests, as the website is very light you will see the difference in billing.
So let’s create a CloudFront web distribution from the AWS console, among the thousand settings I dwell on the first: Origin Domain Name. Here you can select our bucket from the drop-down menu, you have to pay attention to this aspect, connecting it in this way will not work the routing system of S3 so in case I will navigate a path like /my-page CloudFront will not be able to go get the /my-page/index.html file as S3 did.
In our case it’s not a problem because we have only one index.html within the root of the site so we can very well use this method and let’s set Default Root Object as index.html (this only applies for the / path. And for the routing problem? The easiest solution is to change the configuration within the Error Pages tab of our CloudFront distribution (it will be visible after creation) for errors of 403 and 404 index.html. It’s not a clean solution, personally I prefer to use the solution to set the static website endpoint served by S3 directly as the HTTP source: <bucket name>.s3-website-<region>.amazonaws.com) .
Pre-launch preparations
At this point in the configuration I am satisfied with the result, the application works well, the application loading time remains below the second, the access to the data in DynamoDB is safe and very fast (60/70ms), the most important thing:
up to this point I spent 0$
being few accesses have always remained in the free tier of AWS that allows you, for a year, to use services for free with very high thresholds, the application could run in beta with few users with the cost always at 0. At the end of this trial year the free thresholds are lowered but anyway, in the phase of testing and staging, it is really difficult to reach $2 billing.
What is missing, however, before you can open the service to the world?
Consumption of resources
The Serverless architecture gives a great advantage, the automatic scaling of resources, this means that if your service works with 10 users, it will work with 1,000 and 1,000,000 users without problems, just have a correct platfond configured for the your credit card. CloudFront has no problems if the load of users increases, Cognito being a managed service we do not worry, DynamoDB instead can be configured with Throughput Capacity fixed that in autoscaling mode where alone will increase and decrease this value.
The first concern that came to my mind was: so I have no control over this scaling?

The first thing you can do to control scaling and resource consumption is set a DynamoDB Throughput Capacity so that if the traffic increases more than expected, the requests are put in throttle and ignored. The AWS SDK will automatically retry the request causing a slowdown of the frontend, perhaps more acceptable than having to pay heavy AWS invoices without having the necessary funds to cover them.
Metrics, metrics and metrics
The most important thing is to monitor CloudWatch metrics for critical services like Lambda, DynamoDB, Gateway API, CloudFront and add alarms to be alerted by e-mail in case something is not working properly.
You can create custom CloudWatch metrics based on application logs saved in CloudWatch Logs, this is very convenient for monitor specific application features. In automatic all Lambda function logs are saved in streams of CloudWatch Logs. A very nice feature of CloudWatch is that you can create custom dashboards where you can insert graphics, change colors, add notes and much more, pay attention that every dashboard created will cost $3 a month so go cautious.
Profiling and analysis
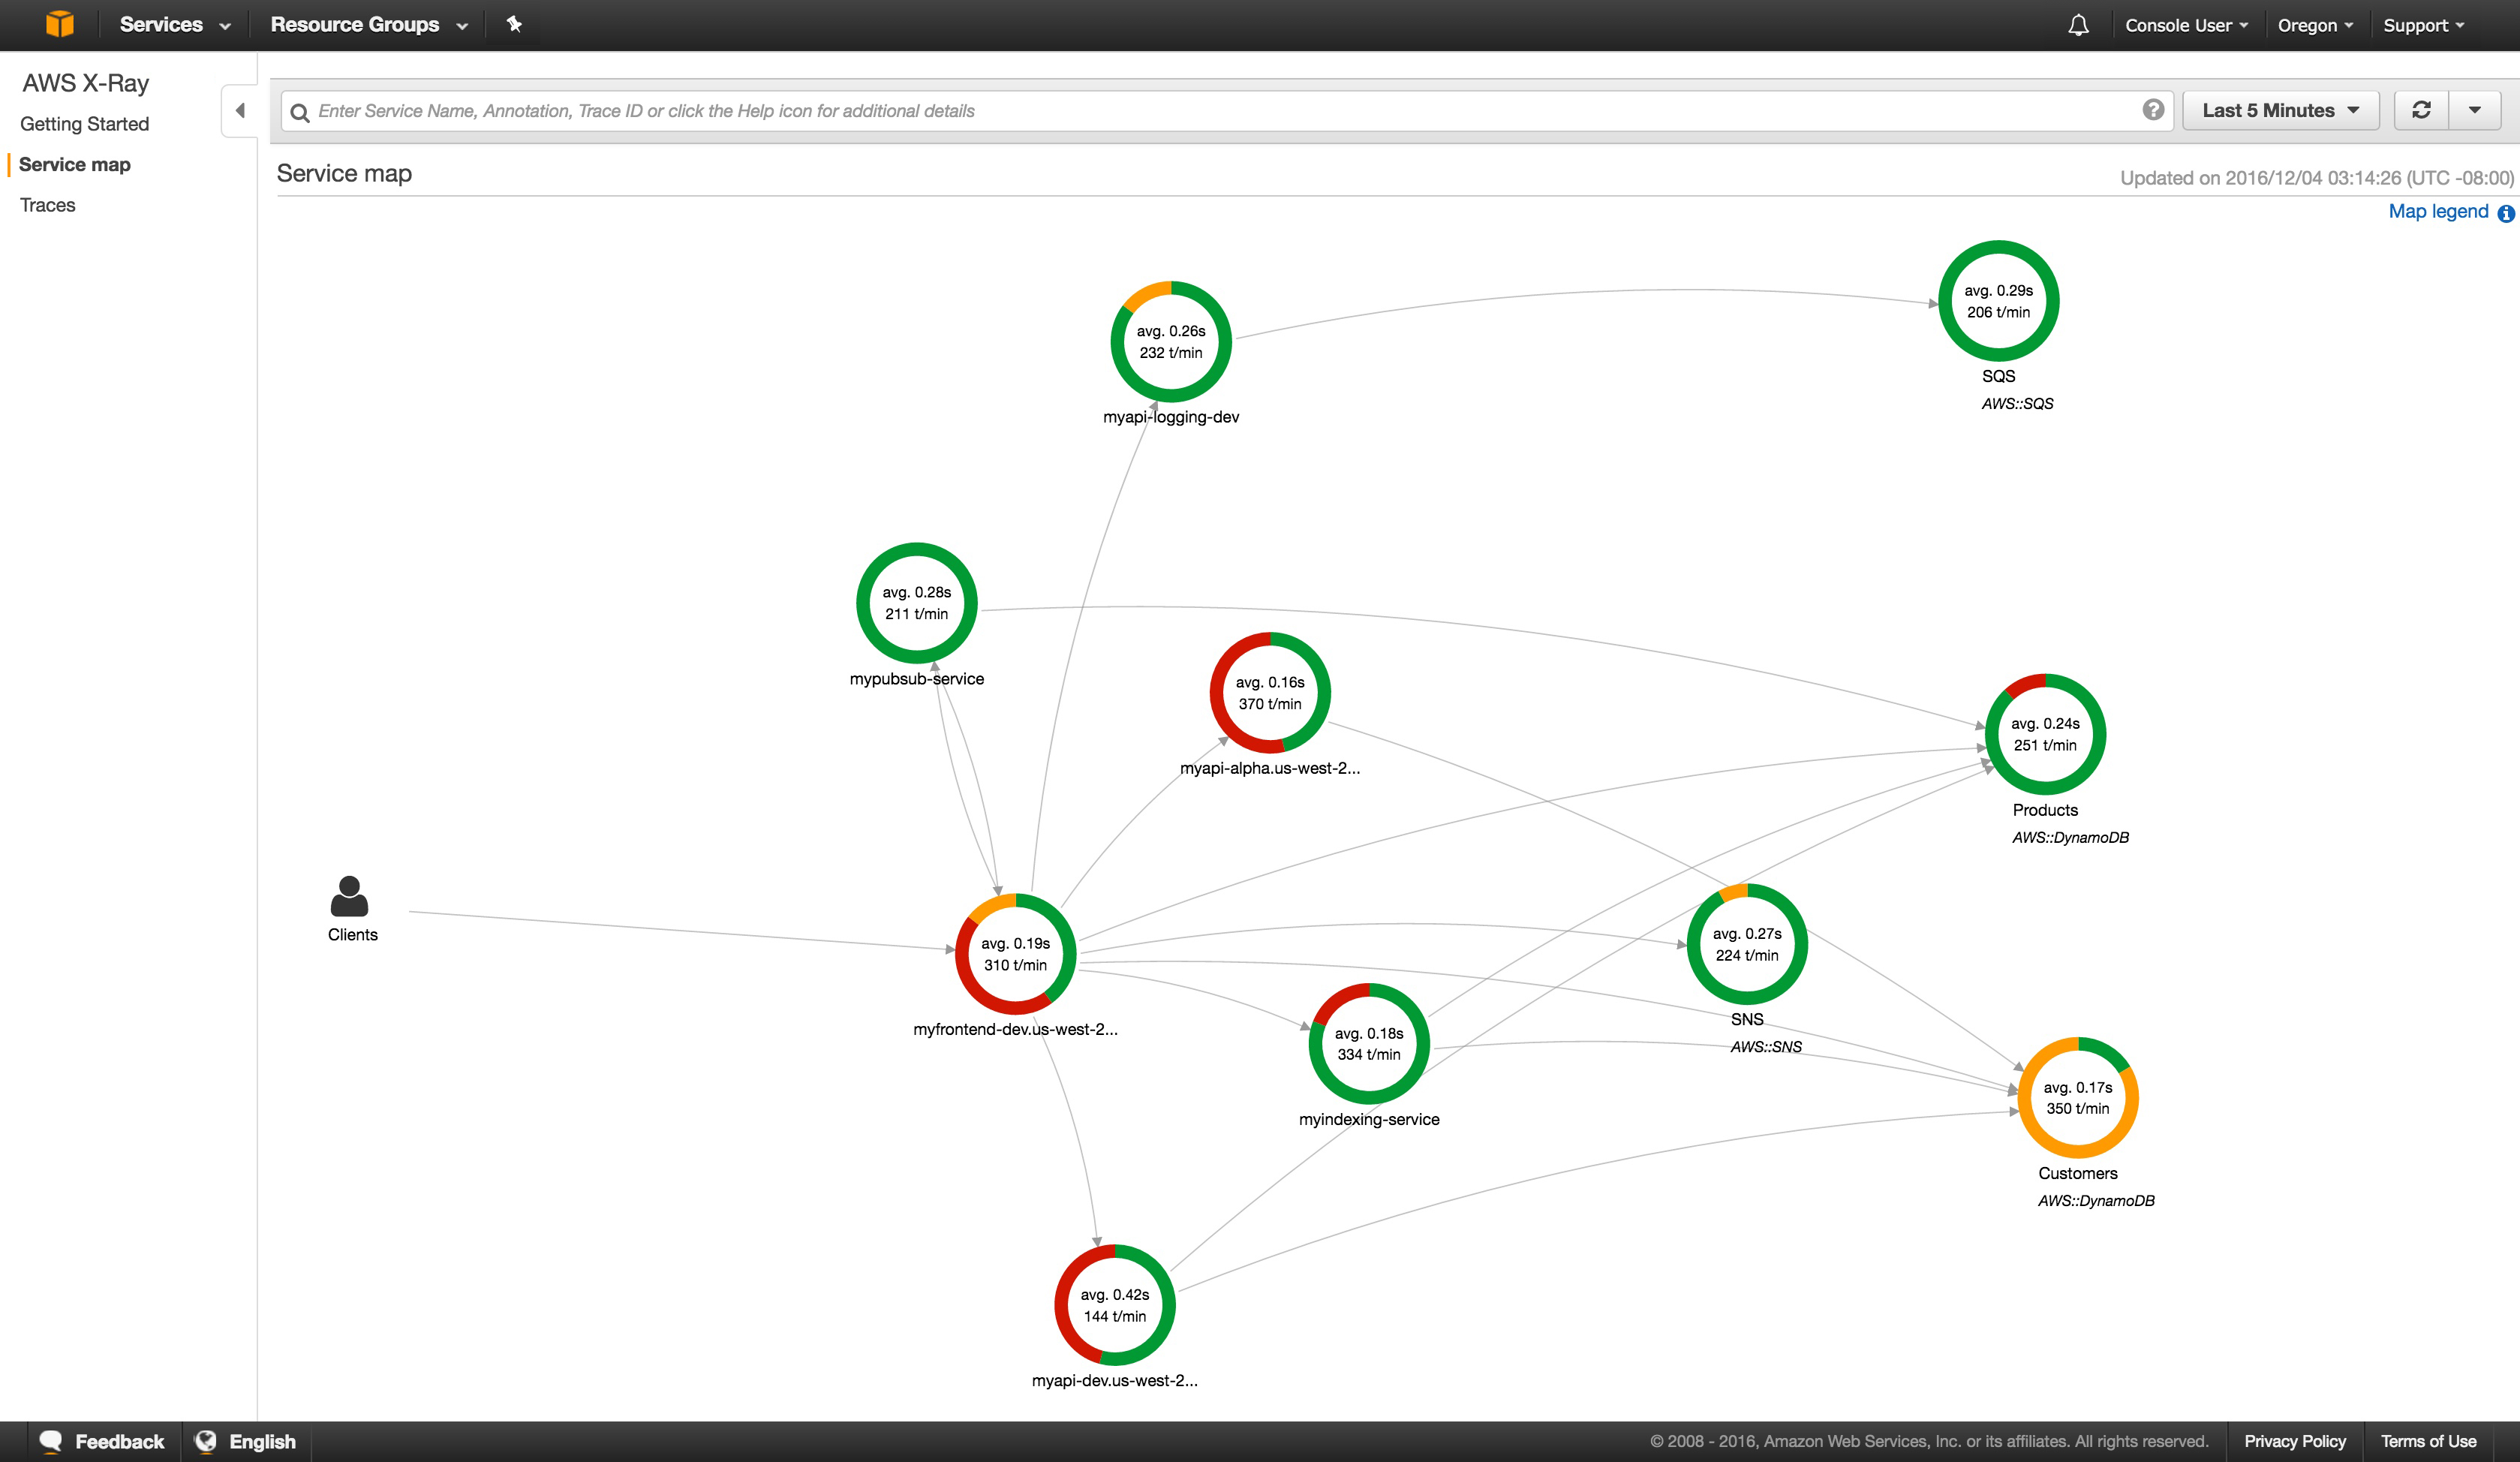
If the application has a lot of Lambda functions to respond to the APIs, process messages in the SQS queues, react to the DynamoDB events, it is advisable to keep this part monitored as much as possible. We must remember the main rule: many functions and quick. It is better to perform many functions during the few milliseconds that few minutes last, which would make AWS bill very quick.
I did an experiment by activating X-Ray (an analysis and debugging service) to my lambda functions. Using the Serverless framework it was really easy, I installed the serverless-plugin-tracing plugin with npm
npm install --save-dev serverless-plugin-tracingand then added to the project ```yml plugins: - serverless-plugin-tracing
Using the AWS SDK inside the Lambda, the latter must be instrumentalized by modifying the inclusion of the module into
```javascript
const XRay = require('aws-xray-sdk');
const AWS = XRay.captureAWS(require('aws-sdk'));
without making any other changes to the code, in a moment, I found all the analysis of the application in a graphical and well-organized in the AWS console.
This is an example of the result:
Billing alarms
Do not start using any AWS service before configuring billing alarms, I find it a vital feature to be alerted if costs start to rise. You can find the official AWS guide that explains how to do here.
Concluding
I took at least a couple of weeks not working continuously, obviously there were many changes of course and experiments. So I hope to have put you on the right track if you want to try this experience for some minor project in order to take the hand. Definitely worth trying, whether or not you have all the architectural knowledge, these Serverless services are also used to make up for the knowledge gap in some areas of server management and delegate this part to cloud providers.
Have fun!
Post of

☝ Ti piace quello che facciamo? Unisciti a noi!
You may be interested also in...
-

Automatic Temporized Rds Scaling
|Temporized RDS read replica AutoScaling with Lambda and Route53 Starting situation One of our hosting infrastructure on AWS recently has encountered some problems due to a huge and rapid increase in traffic during some pre-defined periods, at the same time as a newsletter, that quickly brought many more users to visit our customer’s Magento e-commerce. -

How to update our ecommerce prices using AWS SES
|Introduction The presented solution is inspired by a specific need of a customer of ours: to allow purchasing managers to update the online store’s price lists quickly without forcing them to use a new tool. -
Ingress rules for dynamic IPs
|Management of Security Group ingress rules to allow access to dynamic IPs. Necessity Our infrastructures are designed to remain isolated in a private subnet of the VPC, this in order to increase the security level and block any type of unwanted access directly from network layer.