
Pipeline Magento2
7 minutes reading
Today I will tell you my experience about the configuration of a Bitbucket pipeline to compile static assets and DI (Dependency injection) and then, run the deployment on the webserver.
Pipeline and CI/CD
What are we talking about? Pipeline, Continuous Integration (CI) and Continuous Delivery (CD) are terms that you may have already heard in DevOps world, but also if you are developers soon or later you’ll hear it.
The Pipeline term means the system where the source code of an application is downloaded from the repository and a series of steps or tasks are performed. This is done in an isolated environment (usually using a Docker container) that should be as close as possible to the one that will host the actual application.
Continuous Integration (CI) is the automatic procedure that brings the changes from a repository (version control server) towards a common environment, usually the staging environment. This operation is also performed several times a day and often test functions are connected to validate the work. This prevents misalignment and incompatible versions of various branches of development and its external libraries.
Continuous Delivery (CD) instead is a procedure that compile code from a repository and and deploy the application to the end user or production web server through various steps.
Magento 1
Using Magento version 1.x many of you surely have configured a pipeline, with any CI/CD service as Bitbucket, Gitlab, Jenkins, Trevis or any other service with no major problems. The key part that facilitates this work is the use of composer for the installation of modules using magento-hackathon/magento-composer-installer explained by Nadia in her article.
The big change
With Magento 2.x you certainly had to deal with the deployment of static asset, compilation of DI and many optimizations.
This requires steps after installation of the modules, of course we try to perform this procedure in the pipeline not to load the web servers during the deployment. In the current version (2.1.7) to execute the commands needed to compile require database connection, this adds a complication: being the pipeline in isolated container, it can not connect to the target environment and database, also It wouldn’t be a good practice.
Bitbucket Pipeline
The first requirement is a repository on Bitbucket, if you use other services like GitLab you can use their pipeline system, very well done, or in case you are using GitHub you need an external service.
Add the Bitbucket the pipeline configuration file, called “bitbucket-pipelines.yml”.
The file structure is very simple, on the first line we indicate which Docker image will be used to run the pipeline containers, in our case we baked an image very similar to production webserver and local system called bitbull/webserver
image: bitbull/webserverNow we can add the statement of the pipeline, there are two possibilities: use it automatically, when any commit is submitted (filterable with tags or branch) or let us start it with a simple click. In most cases there is a single staging server and you don’t want accidentally overwrite someone else’s changes, which currently is testing a feature. We should follow the second plan.
We declare that we want a manual pipeline
custom:
    01_staging:

    02_production:
We now declared two pipelines, one for each environment. One useful tip is to prefix the name with an incremental number, this is because Bitbucket will show them in alphabetical order and we don’t want the first selected value is “Production” instead of “Staging”.
Then we add the commands that will be executed, doing it in “step” section (currently only one step at pipeline is supported, but in the future will be able to run them more than one in parallel) and we use environment variables to make all the things more configurable. A tip is to use the same name in scripts and enhance them based on the target environments that we want to use.
01_staging:
      - step:
          script:
            - export LOCALES="en_US it_IT"
            - chmod +x deploy-scripts/Build.sh && ./deploy-scripts/Build.sh
Bear in mind that all commands are executed from a file stored in the repository, this to make it more readable.
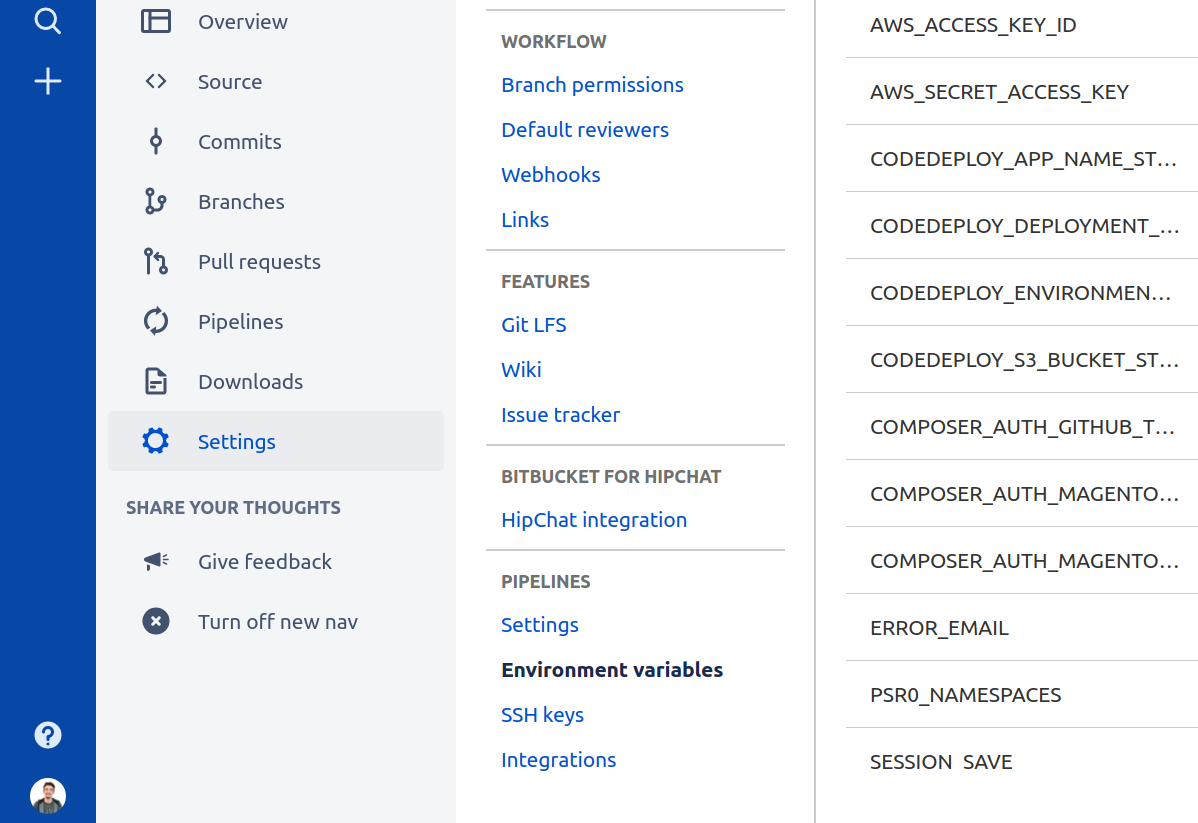
You can configure the environment variables from the settings panel and obfuscate those at risk such as the user’s AWS credentials.
So, let’s write commands required from compiling process creating the file “./deploy-scripts/Build.sh”
#!/usr/bin/env bash

set -e # interrompe l’esecuzione in caso di errore

TAG=$BITBUCKET_COMMIT

#Configurazione di composer

COMPOSER_AUTH=$(cat <<EOF { "github-oauth": { "github.com": "$COMPOSER_AUTH_GITHUB_TOKEN" }, "http-basic": { "repo.magento.com": { "username": "$COMPOSER_AUTH_MAGENTO_REPO_USERNAME", "password": "$COMPOSER_AUTH_MAGENTO_REPO_PASSWORD" } } } EOF ) mkdir -p /root/.composer && echo "$COMPOSER_AUTH" > /root/.composer/auth.json

composer install --no-dev
With these commands we will install all Magento modules and the core itself, I recommend to put the .lock composer file under version control to avoid any problem during this step by knowing in advance which versions will be installed.
At this point something is missing, the database connection! Bitbucket allows us to create a service, namely a second docker container, connected to the one that executes the steps.
Let’s go back to the configuration file and add to the bottom of bitbucket-pipelines.yml file as follows
definitions:
  services:
    mysql:
      image: mysql
      environment:
        MYSQL_DATABASE: 'magento'
        MYSQL_ROOT_PASSWORD: 'root'
In this way, we are adding a container with a MySQL instance with a database already created named “magento” with root user’s password populated.
We add this service to the declaration of pipeline
01_staging:
      - step:
          script:
            ...
          services:
            - mysql
Now we can connect to our temporary database and load a dump taken from the staging and cleaned up by log tables.
# Connessione al database ed esecuzione del dump

M2_DB_HOSTNAME=127.0.0.1
M2_DB_NAME=magento
M2_DB_USERNAME=root
M2_DB_PASSWORD=root

aws s3 cp s3://$CODEDEPLOY_S3_BUCKET/$CODEDEPLOY_ENVIRONMENT/dump.sql /tmp/dump-$TAG.sql # scarichiamo da un bucket S3 il file di dump
mysql -h $M2_DB_HOSTNAME -u $M2_DB_USERNAME -p"$M2_DB_PASSWORD" $M2_DB_NAME < /tmp/dump-$TAG.sql # applichiamo il dump

ENV_FILE=$(cat <<EOF ADMIN_FRONTNAME="admin" APP_KEY="$APP_KEY" SESSION_SAVE="files" DB_HOSTNAME="$M2_DB_HOSTNAME" DB_NAME="$M2_DB_NAME" DB_USERNAME="$M2_DB_USERNAME" DB_PASSWORD="$M2_DB_PASSWORD" MAGE_MODE="production" CACHE_MODE="disable" WEBSERVER_USER="www-data" EOF ) echo "$ENV_FILE" > .env
composer run-script generate-config # usiamo un modulo sviluppato da noi per creare il file di configurazione env.php
Now Magento is connected to the database and we can execute the CLI commands to run compiling process
# Magento deploy
php bin/magento module:enable --all # abilitiamo tutti i moduli

php bin/magento setup:upgrade
php bin/magento setup:di:compile
php bin/magento setup:static-content:deploy $LOCALES
Let’s clean the repository
rm app/etc/env.php
rm .env
rm -r var/cache/*
rm -r .git/
rm docker-compose.yml
rm Vagrantfile
An essential part of the CI / CD is the creation of an artifact, which is a file including the version of the application ready to run.
zip -r /tmp/release-$TAG.zip .So, our version is ready for deployment. For this last step in Bitbull we use a special AWS service called CodeDeploy that, with some configuration, allows us to bring the new version on our servers. This is possible with few extra lines.
aws s3 cp /tmp/release-$TAG.zip s3://$CODEDEPLOY_S3_BUCKET/$CODEDEPLOY_ENVIRONMENT/release-$TAG.zip
aws deploy register-application-revision --application-name $CODEDEPLOY_APP_NAME --s3-location bundleType=zip,bucket=$CODEDEPLOY_S3_BUCKET,key=$CODEDEPLOY_ENVIRONMENT/release-$TAG.zip --region $AWS_REGION

aws deploy create-deployment --application-name $CODEDEPLOY_APP_NAME --deployment-group-name $CODEDEPLOY_DEPLOYMENT_GROUP --s3-location bundleType=zip,bucket=$CODEDEPLOY_S3_BUCKET,key=$CODEDEPLOY_ENVIRONMENT/release-$TAG.zip --region $AWS_REGION
This command is asynchronous, so the pipeline will end without waiting CodeDeploy, to monitor your progress, and check the presence of any errors you need to access the AWS console. We have connected CodeDeploy notifications to our Slack to be notified in case of errors.
Save the script file and pipeline configuration file, then you have to do a commit.
Manual Pipeline Execution
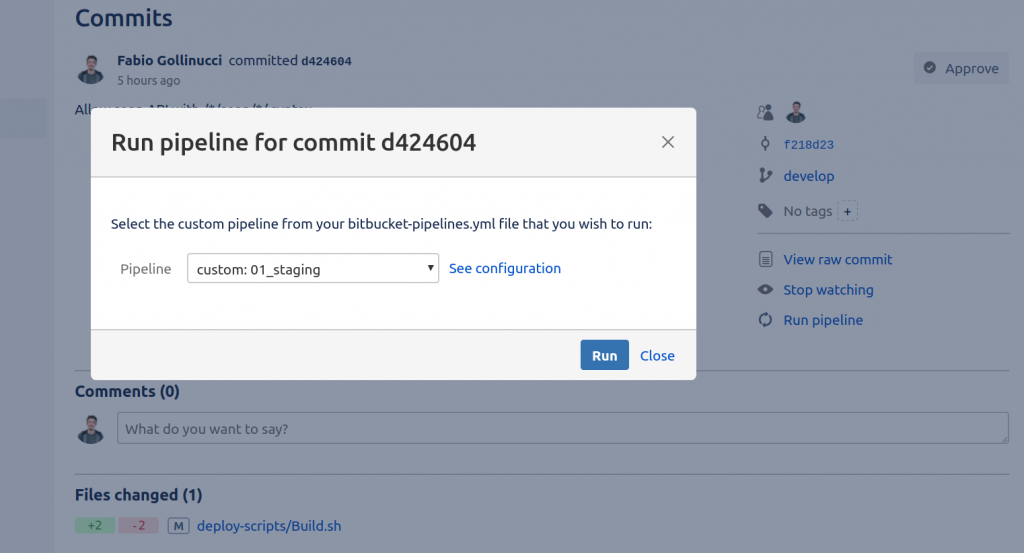
Now our pipeline is ready, we can run it.
We go on Bitbucket and choose which commit to starting from the pipeline, you can also select a branch and will last commit on it will be used..
You will find on your right the command “Run pipeline”, click on it and Bitbucket will show you all the pipelines declared in the configuration file.
Once it is launched a special control panel will open, it shows the output of the commands; In the case of errors, this is the place to check out what the problem is.
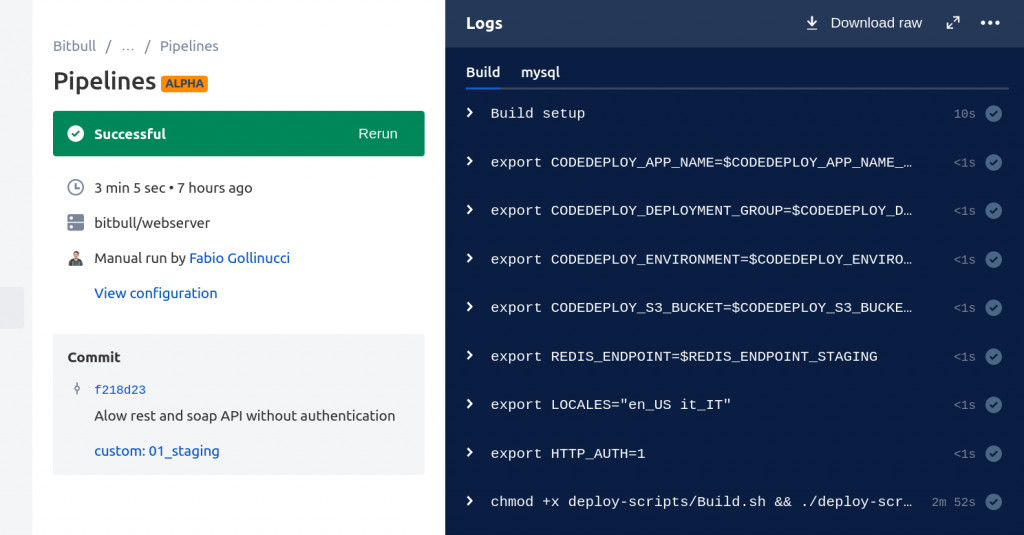
During execution on the left side will appear a “stop” button that can the execution, in the case you launched it by mistake. At the end, however, with the “rerun” button you can run it again starting from the same commit.
Tips & Tricks
Cache
To speed up the downloading of composer modules it is convenient to use the pipeline cache. Be careful to use the default served from Bitbucket, otherwise all modules under /vendor directory will be cached and there will be no Magento core symlinks created by composer during the install command. In Bitbull, we use a solution that helps partially, but not yet optimized.
At the bottom of the bitbucket-pipelines.yml files add the following lines
definitions:
  services:
    ...
  caches:
    composercache: ~/.composer/cache
and then connect it to the pipelines to apply the configuration
01_staging:
      - step:
          caches:
            - composercache
Notifiche
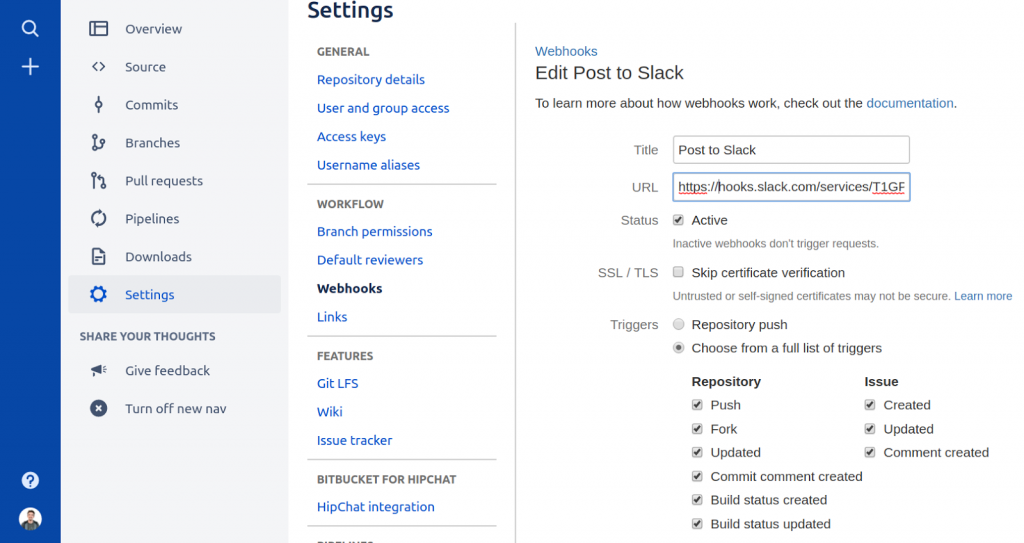
If you use Slack as a messaging app you’ll be more comfortable creating a WebHook to send notifications in the project channel.
Post of

☝ Ti piace quello che facciamo? Unisciti a noi!
You may be interested also in...
-

Git Flow: how it works
|The versioning control systems let you keep track of any changes made over time and to cooperate more efficiently within teams of many people, in particular if, as in Bitbull, work remotely.