
Git Flow: how it works
10 minutes reading
The versioning control systems let you keep track of any changes made over time and to cooperate more efficiently within teams of many people, in particular if, as in Bitbull, work remotely.
We will not go into the explanation of what a version control system is, but rather we will see how to better manage the development flow with Git, the distributed version control software.

Typically a repository is divided into two branches, master and develop, where master is the main branch which the code of the production’s version project resides in, while develop is the version with the latest developments that are about to be published and it is usually the active branch in test environment (from now on “staging”). Every changes/adding are done on a feature branch generated starting from develop. While the hotfixes are done directly on master (and then aligning develop).
We will see how to do this using Git Flow which is nothing but a procedure to make it automatic but with some more things and rules to do it correctly.
Before using git flow, we created branches starting from develop called, for instance, “fix123” and the visual structure of the repo was as follows:
- develop
- master
- fix123
In Bitbull, we already used to naming the feature branches like this: “feature/fix123” so the visual structure (and those who use SourceTree can better understand here) was:
- develop
 |_ feature
   |_fix123
 - master
After learning Git Flow, I understood why.
So, let’s go deep down into Git Flow.
Introduction
Every public or private project/repo should have a tag for every version released in the x.y.z. form so that we can refer to this version number and be able to “time travel” between a version and the other depending on what each one contains rather than having to remember a specific commit. It’s the release note or changelog (discussed below) that summarise us what’s contained in each version.
The version number is build by using the semantic versioning:
MAJOR.MINOR.PATCH
where
MAJOR is a non-backward compatible version with the previous (a break with the past)
MINOR is instead a backward compatible change (that’s a feature or more)
PATCH a backward compatible bugfix (that’s a fix)
To help us, we could keep in mind this triad:
break – feature – fix
Features are all those tasks that include addition of functionalities, the usual execution of tasks, etc; hot fixes are urgent bug fixes that have to be deployed into production straight away. A fix can also be simply a documentation updating or reformatting code, even a refactoring that, by definition, does not alter the behavior so it does not add any new feature.
Understood this is also easy to understand why you need a release for features while not for hotfixes because they are released directly in production.
How to do it
First of all, the repository should be prepared for the Git Flow usage.
For those who use SourceTree it’s just enough pressing a button, for all the others: https://danielkummer.github.io/git-flow-cheatsheet/. On SourceTree click on the Git Flow button
that’s the same of:
$ git flow init
This command establishes the names to be used in git flow which are usually like this:
Production branch -> master
Development branch -> develop
Prefissi per:
Feature branch -> feature/
Release branch -> release/
Hotfix branch ->hotfix
Tag version: you can leave it empty or, as someone like, put a “v” so that the tag of every version will appear like this: “v1.0.0”
You can find these configurations in the config file found into the .git folder in the root of your project:
[gitflow "branch"]
  master = master
  develop = develop
[gitflow "prefix"]
  feature = feature/
  release = release/
  hotfix = hotfix/
  versiontag = v
  support = support/
so if you need to change something you can do it here (for those using line commands can find here https://github.com/petervanderdoes/gitflow-avh/wiki/Reference:-git-flow-config a list of commands to use to update the config)
Once this is done, if we started with only one branch, that’s a master, then develop will be created.
We are now ready to use the flow. The structure of our repo becomes like this:
develop
master
Feature vs Hotfix
We have new tasks to do on the project, change a color, improve a page, add a new function to a module, then we’ll work on a feature that we will call “TASK”:
$ git flow feature start TASK
(in SourceTree gitflow button > Start a new feature)
The new branch will start automatically from the last commit of develop (it is still possible to specify a commit or a working copy revision from which it should start), it will ask the name of the branch in which we write “TASK” and here is our tree:
develop
 |_feature
   |_TASK
 master
We therefore work on this branch, we show it to the customer, he likes it, he confirms it and we are ready to bring it into develop:
$ git flow feature finish TASK

The branch refers to develop and is deleted only from the local machine. It should be done by hand on the remote repository or as they say here http://stackoverflow.com/questions/11151623/does-git-flow-deletes-branch-on-remote-server from command line with -F. Pheeeew, cleaning!
Let’s pretend this branch is enough and you want it now into production. A release is necessary. Suppose we are at version 1.0.0 and we have to release this new feature:
$ git flow release start 1.1.0
Here we create the release by increasing the second number by 1 and reporting the third to ZERO.
The tree:
develop
 master
 |_release
   |_1.1.0
Let’s go now editing (if not present we’ll create it) the release note that can be in the form of releasenote.txt or CHANGELOG.md in the root of the repo. This file has more or less these features:
# Change Log

## 1.0.0
 - Version 1
(inspired by http://keepachangelog.com/)
In which are listed all the changes made (we use the markdown as markup) so now we may add a list of things that this release includes. Since we made the changes asked by the TASK we will write this:
# Change Log

## 1.1.0
 - Ref. #xxxx I made the TASK

## 1.0.0
 - Version 1
We list the changes made (by convention in Bitbull we are also used to add a reference to the task) and commit.
DONE. The release is ready. Before closing it, it is a good idea to sail through the whole site and check that it works and nothing has been broken. If everything is ok we can close the release:
$ git flow release finish 1.1.0
Here’s how it looks on SourceTree:
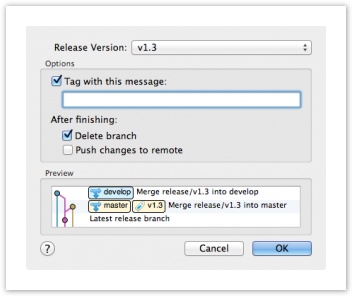
We always tick delete branch because it is not necessary to keep this branch (above all, in theory the release is an operation done by one person on the local machine so the branch is not even pushed) and we write the comment of the tag (it is not particularly relevant, found only in git show <tag>, as a convention we put “close release”).
Closing a release does these operations:
- merges release into master
- creates a tag with the release number (1.1.0)
- merges release into develop
- delete the release branch
We push everything (develop and master) on the online repo:
$ git push origin develop master --tags
If you have a look at the repo on bitbucket (or directly in SourceTree) you will see that in the master branch there is a beautiful tag with the name of the new version:

And here is the new version of the project!
URGENT bug to fix!!!!1!
Oh no, we’ve just deployed everything on production but a bug has been released to be fixed immediately. We must therefore do an hotfix on the fly!
$ git flow hotfix start 1.1.1
The bug to be fixed concerns this release just deployed, so to create it we increase the last version number (which is precisely intended for bug fixes)
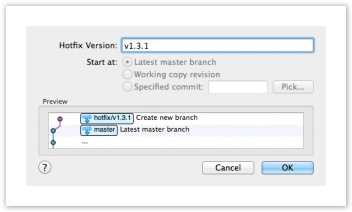
As we can also see in the image, the branch of the hotfix will start automatically from master without other choice. Here, unlike the feature, SourceTree do not ask you the name but the version number. In order not to make mistakes and to know which one to use, just look at what is the last number in the release note / changelog and increase the last number.
The tree:
develop
 master
 |_hotfix
   |_1.1.1
We make changes, we make sure that everything works and we update the release note:
# Change Log

## 1.1.1
 - Ref. #xxxx Fixed the bug

## 1.1.0
 - Ref. #xxxx I made the TASK

## 1.0.0
 - Version 1
we commit and close the hotfix:
No other information are required.
Closing an hotfix makes these things happen:
- it merges the hotfix into master * creates a tag with the name of the hotfix (1.1.1) * merges the hotfix into develop * deletes the hotfix branch
We push everything (develop and master) on the online repo:
$ git push origin develop master --tags
Note that in this case it is not necessary to make a release because the change is already reported on master and develop when the branch is closed.
Awesome. Now we have this new version which you can easily pull (for instance to update staging after deployment):
$ git checkout tags/1.1.1
The same thing could be done by executing the pull of develop, but the usefulness of the tags comes when the customer tells us “no wait we are not ready, we lack the following products and we can not yet go online with these features” . At that point, you can go back to the first version as if nothing had happened with:
$ git checkout tags/1.0.0
Cool, isn’t it??
Other examples
More people are working on the repo or you’re alone, but you’re working on more tasks to be released in the next deployment:
develop
 |_feature
   |_TASK1
   |_TASK2
   |_TASK3
 master
and suppose that the customer has seen them all and approved we will proceed to update the release notes BEFORE closing the feature and we will do like this:
# Change Log

## unreleased
 - Ref. #xxxx Done TASK1

## 1.1.1
 - Ref. #xxxx Fixed the bug

## 1.1.0
 - Ref. #xxxx I made the TASK

## 1.0.0
 - Version 1
using the titled “unreleased” in a way that, when everything will be closed and copied on develop, you will have an automatic merge of this file that will report all the changes made until this point:
# Change Log

## unreleased
 - Ref. #xxxx Done TASK1
 - Ref. #xxxx Done TASK2
 - Ref. #xxxx Done TASK3

## 1.1.1
 - Ref. #xxxx Fixed the bug

## 1.1.0
 - Ref. #xxxx I made the TASK

## 1.0.0
 - Version 1
At this point it will be possible to create our release with the procedure just described and update the release note with the final version number for the deployment:
# Change Log

## 1.2.0
 - Ref. #xxxx Done TASK1
 - Ref. #xxxx Done TASK2
 - Ref. #xxxx Done TASK3

## 1.1.1
 - Ref. #xxxx Fixed the bug

## 1.1.0
 - Ref. #xxxx I made the TASK

## 1.0.0
 - Version 1
Note that, being passed to a new feature, the number assigned to the hotfixes is reset.
It may happen that you are working on a complex feature branch that could end up in subsequent deployment but not in the next one. It is therefore a good rule, in this case, for each deployment released in production, merging develop into the feature branch on which you’re working in order to resolve any conflicts directly in this branch and to test that everything works even with the new features released in parallel. This also prevents to end up into the closing of this release several releases later and having to resolve a multitude of conflicts during this operation that should rather run smoothly.
Questions? Doubts? Concerns?
Post of
Lorena Ramonda☝ Ti piace quello che facciamo? Unisciti a noi!
You may be interested also in...
-

Pipeline Magento2
|figure{ text-align: center; } figure img { margin: 0.5em; } Today I will tell you my experience about the configuration of a Bitbucket pipeline to compile static assets and DI (Dependency injection) and then, run the deployment on the webserver.